Quick Navigation
- 1. What Does “Automated Branding” Actually Mean?
- 2. How Much of Branding Can Actually Be Automated?
- 3. Step-by-Step: How to Build Your Brand Using Free Tools
- Step 1: Define Your Brand Identity
- Step 2: Generate Your Logo
- Step 3: Lock In Your Colors and Fonts
- Step 4: Create Your Visual Templates
- Step 5: Automate Your Social Posting
- Step 6: Set Up Your Brand Writing Tone
- Step 7: Automate Blog Posting to Your Website
- 4. Real-World Example
- 5. The Mistakes Most People Make When Automating Their Brand
- 6. The Bottom Line
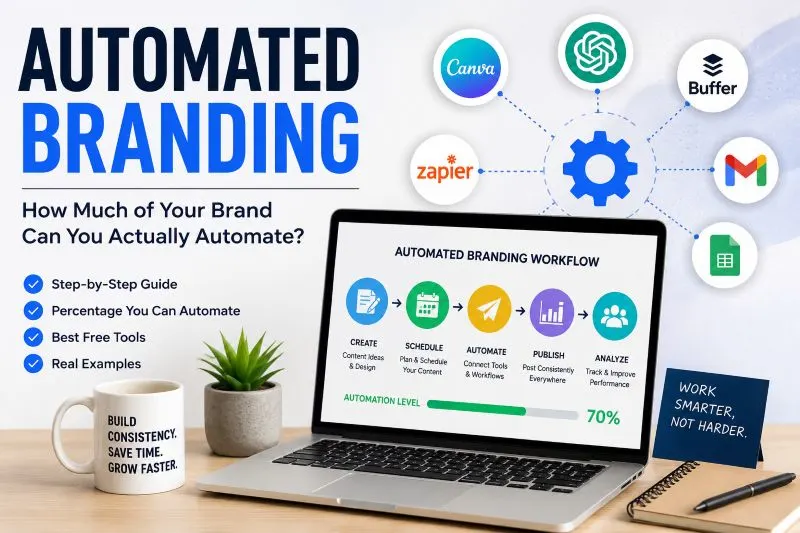
Automated Branding: Can You Really Build a Brand with Automation?
Most people think branding is something only big companies with design teams and marketing budgets can pull off properly. But here’s what’s changed: a huge chunk of the branding process can now be automated, and you don’t need to pay anyone to do it.
Automated branding isn’t about removing the human touch entirely. It’s about letting tools handle the repetitive, time-consuming parts so you can focus on the decisions that actually matter.
So what can realistically be automated? And what free tools actually work? Let’s get into it.

What Does “Automated Branding” Actually Mean?
When people hear “branding,” they usually think of a logo. But branding is so much more than that. It’s your color palette, your fonts, how your social posts look, the tone of your copy, how consistent your visuals are across platforms.
Automating all of that used to require a team. Now it doesn’t.
The idea behind automated branding is simple: you define your brand identity once, feed it into tools, and those tools handle the execution. Logo generation, social media templates, color consistency, font pairings, even writing tone. A lot of that can run on its own once you’ve set it up.
The key word is “set it up.” You still need to make decisions. But you only make them once.
How Much of Branding Can Actually Be Automated?
Here’s an honest breakdown. Not everything can be automated, and you should know the difference before you start.
What can be automated (roughly 70-80% of the work):
- Logo design and icon generation
- Color palette creation and consistency
- Font pairing and typography suggestions
- Social media post templates and sizing
- Basic brand guideline documents
- Scheduling and posting branded content
- Writing tone and style suggestions
- Simple ad copy and taglines
What still needs a human (the remaining 20-30%):
- Strategic brand positioning (who are you for and why?)
- Major design decisions and approvals
- Brand voice refinement over time
- Crisis or reputation-related decisions
- Content that requires real storytelling or emotion
If you’re just starting out, that 70-80% automation number is genuinely useful. It means you can have a complete, consistent-looking brand without spending hundreds of dollars or weeks figuring it out.
Step-by-Step: How to Build Your Brand Using Free Tools
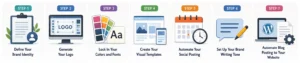
Let’s walk through this practically. You’re a solo founder, freelancer, or small business owner. You want to look professional without hiring a branding agency. Here’s how you do it.
Step 1: Define Your Brand Identity (30 Minutes, No Tools Needed)
Before you touch any software, write down answers to these three questions:
- Who is your audience and what do they care about?
- What feeling should your brand give off? (trustworthy, bold, playful, minimal?)
- What makes you different from others in your space?
Write this in plain sentences. This becomes your brief for every tool you use.
Step 2: Generate Your Logo
Free tool: Looka (free preview), Canva (free tier), or Adobe Express (free tier)
Go to Canva or Adobe Express and use their logo maker. Type in your brand name, pick your industry, choose a style that matches what you wrote in Step 1.
You’ll get several logo options within minutes. Pick one that fits, download it, and move on. Don’t spend hours on this.
If you want more variety, Looka shows you previews for free before you pay. Some people use those previews as starting-point inspiration and then recreate the idea in Canva.
Step 3: Lock In Your Colors and Fonts
Free tool: Coolors.co and Google Fonts
Go to coolors.co and generate a palette. You can lock a color you like and keep regenerating until the rest of the palette looks right. Pick 3 to 4 colors: one main, one accent, one neutral, and optionally a dark or light contrast color.
For fonts, go to Google Fonts and pick two that work together. One for headings, one for body text. A common starting point is pairing a serif with a clean sans-serif. Fonts like Inter, Lato, or Montserrat pair well with most brand styles.
Write down your hex codes and font names. You’ll use them everywhere.
Step 4: Create Your Visual Templates
Free tool: Canva (free tier)
This is where the automation really starts. In Canva:
- Create a brand kit (free tier gives you limited access, paid gives more)
- Design one template for each platform: Instagram post, LinkedIn post, Facebook cover, email header
- Save them as templates so every future post uses the same colors, fonts, and layout
Once you’ve built these once, creating new content takes minutes, not hours. The visual consistency across everything you publish is what makes a brand look real and established.
Step 5: Automate Your Social Posting
Free tool: Buffer (free plan) or Later (free plan)
Connect your social accounts to Buffer or Later. Schedule your branded posts in batches. You sit down once a week, load in your content, and the tool posts it for you automatically at the right times.
This is huge for consistency, which is one of the most important things in branding. Showing up regularly with a consistent look is more powerful than showing up perfectly once.
Step 6: Set Up Your Brand Writing Tone
Free tool: ChatGPT (free tier) or Claude (free tier)
Write a short paragraph describing your brand voice. Something like: “We’re a casual, helpful brand for small business owners. We avoid jargon. We’re direct but warm.”
Paste that into your AI writing tool as a system prompt or just include it at the start of your requests. Every time you need copy, captions, taglines, or email subject lines, the tool will match your tone automatically.
Step 7: Automate Blog Posting to Your Website
Free tools: WordPress.com (free plan), Zapier (free tier), and ChatGPT or Claude (free tier)
This is where things get genuinely hands-off. Most people write a blog post and then manually log in, format it, add tags, set a category, and hit publish. You can cut all of that out.
Here’s how the basic setup works:
- Use an AI writing tool to draft your blog post in your brand voice (your prompt from Step 6 does this automatically)
- Paste the finished draft into a Google Doc or Notion page
- Use Zapier to connect that document source to your WordPress site. When a new doc is added or a specific label is applied, Zapier triggers a new draft post in WordPress
For WordPress users specifically, there’s also a free plugin called Publicize (built into Jetpack’s free tier) that automatically shares your new post to connected social accounts the moment it goes live. So the blog goes up, and your social channels update without you touching anything.
If you want even more control, tools like Make (formerly Integromat) on the free tier let you build multi-step automations: AI generates the post, it gets formatted, pushed to WordPress as a draft, reviewed once, then scheduled to publish at a set time.
The realistic version for most people: you spend 20-30 minutes approving and lightly editing an AI-drafted post, then click “schedule.” The tool handles the rest, including publishing and cross-posting. That’s it.
One thing to keep in your workflow: always do a quick read-through before it goes live. Automation handles the heavy lifting, but your name is on that post. A two-minute scan catches anything that doesn’t sound right or needs a small tweak before your audience sees it.
Real-World Example: A Freelance Photographer Starting From Scratch
Imagine you’re a freelance photographer just starting to market yourself online. No brand, no budget, no designer.
Here’s how this plays out:
You spend 30 minutes on your brand brief. Your audience is couples planning weddings. Your vibe is warm, romantic, a little cinematic.
You go to Canva, pick an elegant serif-based logo template, change it to your name, export it. Done in 20 minutes.
You go to Coolors, build a palette around warm tones: a dusty rose, a soft beige, a deep mocha. You pair Playfair Display (headings) with Lato (body text) from Google Fonts.
You build five Canva templates: Instagram feed post, Instagram story, Facebook post, email header, website banner. Each one uses your exact colors and fonts.
You connect Buffer and schedule two posts a week using your templates. You write captions using Claude with your brand voice prompt saved.
Total time: maybe 4-5 hours across a weekend. Total cost: zero dollars.
Six months later, your Instagram looks polished and consistent. Clients comment that your brand looks professional. None of them know you built it for free.
The Mistakes Most People Make When Automating Their Brand
Knowing the tools isn’t enough. Here’s where things go wrong.
Using too many fonts and colors. Automation tools give you options. More options isn’t always better. Stick to the palette and fonts you chose. Consistency beats variety.
Skipping the brand brief. People jump straight to Canva without knowing what feeling they’re going for. The result looks random, even if each individual post looks okay.
Changing the logo constantly. Once you’ve made a decision, stick with it for at least a year. Branding takes time to register with people. Don’t keep tweaking.
Treating automation as a permanent solution. The tools help you get started and stay consistent. But as your brand grows, you’ll need to revisit your positioning, update your visuals, and sharpen your voice. Automation handles execution, not strategy.
The Bottom Line
You don’t need a big budget or a design background to have a real brand. The combination of Canva, Coolors, Google Fonts, Buffer, and an AI writing tool covers most of what a solo creator or small business needs.
Set it up once, use it consistently, and give it time. That’s really it.
Automated branding isn’t a shortcut to a great brand. It’s a way to get your brand out of your head and into the world faster, and then keep it running without burning out.
Start with Step 1. Everything else follows from there.